

Intro - I don't know what should we call this 'Creating and adding a new virtual disk to a Windows virtual machine in VMware Workstation' or 'Add second disk to a Windows virtual machine'. Well both meanings are same. Everyone knows about Vmware Workstation. This is very much useful software if you want to test different Operating Systems at one place. Some time we face a problem that we installed an operating system in vmware in 10GB of partition and after installation we realize that we need more Disk Space. So we will recognize our data in well manners.
There many way to increase your Disk Space like you can extend your present disk space etc. In this tutorial we will discuss to add a new partition. This is also useful if you want to test your OS how it work in dual boot. Because after creating two separate partition in same OS you can install Two OS like dual boot.
How can you install dual boot OS in VMware - We will discuss it later
You may want to add a new virtual hard drive if:
How can you install dual boot OS in VMware - We will discuss it later
You may want to add a new virtual hard drive if:
- You are running out of space on the first disk
- You want to use the other virtual hard disk as a dedicated virtual drive for backing up files in the virtual machine
- You want a virtual disk which can be migrated to another virtual machine on a different location to transfer files and folder
- You want to do dual boot in Vmware
(Click image for large view)

1. Select Your Operating System. Here I selecte Windows 8 then go to VM → Settings

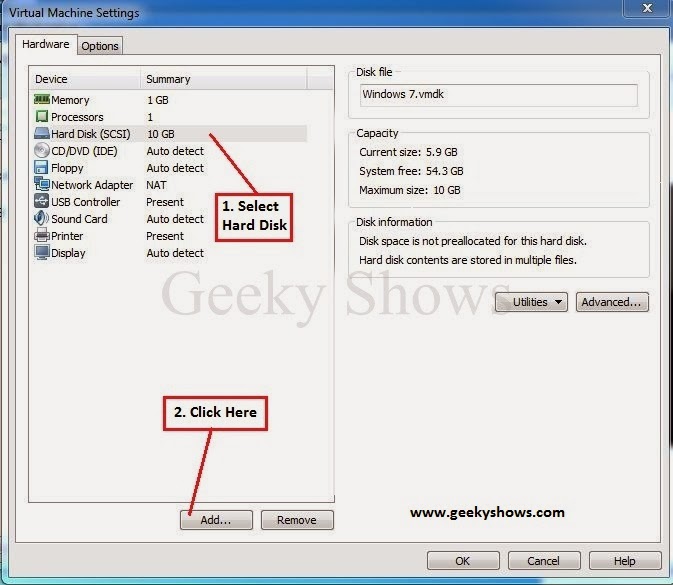
2. Select Hard Disk and Click on Add
3. Select Hard Disk and Click on Next

4. Select Create a new virtual disk and Click on Next

5. Select SCSI and Click Next

6. Resize your disk size according to your need then Click Next

7. Click Next

8. As you can see there is a New Hard Disk added. Click OK

9. Now, Turn ON Your Windows 8 System.

10. Your Windows 8 has been started. Now, Press CTRL + R then type diskmgmt.msc and Click OK

11. After Clicking OK This Window will be appear. Click OK

12. Now, Right Click on Unallocated Disk and Click on New Simple Volume

13. Click Next

14. Click Next

15. If you want to change Drive letter than choose any of letter from the list as well you can leave it by default. Click Next

16. Click Next

17. Click Finish

18. If it is showing that New Volume is Healthy means our new partition is ready to use.

19. If you didn't see a dialogue box regarding format the new Hard Drive then you need to do it manually by going My Computer. Right Click on New Volume then Click on Format

20. Check Quick Format box and Click on Start

21. Click OK

22. Format Complete. Click OK

23. Now, Your New Hard Drive is Ready to use

(Click image for large view)
Note - Process is same for Windows Vista/ WIndows 7/ Windows Server 2008
Related Post:
How to Do Dual Boot in VMware
Like it ? Share it.


![SQL Injection Basics - Union Based [Detailed Tutorial]](https://blogger.googleusercontent.com/img/b/R29vZ2xl/AVvXsEjjQpa2wuMB-m5CXPVf71GUOkfiIOQA8KTyQ-_zfAl0SZa23UBN1QJaO2ZMGRDZlmDJTYf2jJ4ik3Xnj1locc38Yv9l6VMxTWt32s86JtXtLABDn20DRuAcbLPKMb9m2hc6PDmjIjvU-us/s72-c/SQL-Injection-Attack.jpg)


No comments:
Post a Comment